How to Create an Awesome Villager Breeder Farm in Minecraft
Hey, Minecraft lovers! Have you ever wished you could have a steady stream of villagers to trade with in the game? Well, you’re in luck! Today, we’re going to show you how to build a villager breeder farm. This cool setup helps you create villagers without you doing much at all! Let’s jump right in!
Why Villagers are Super Handy
First, let’s talk about why villagers are so important in Minecraft. They can trade with you, offering precious items in exchange for emeralds (which are like currency in the game). The more villagers you have, the more trading options you get. So, having a villager breeder can be a game-changer!
What You’ll Need
To build your villager breeder, you’ll need some items. Don’t worry—these are easy to find, especially if you’re just starting. Here’s a list of what you’ll need:
- 2 Villagers: You can bring them from nearby villages.
- 1 Composter: Used for farming.
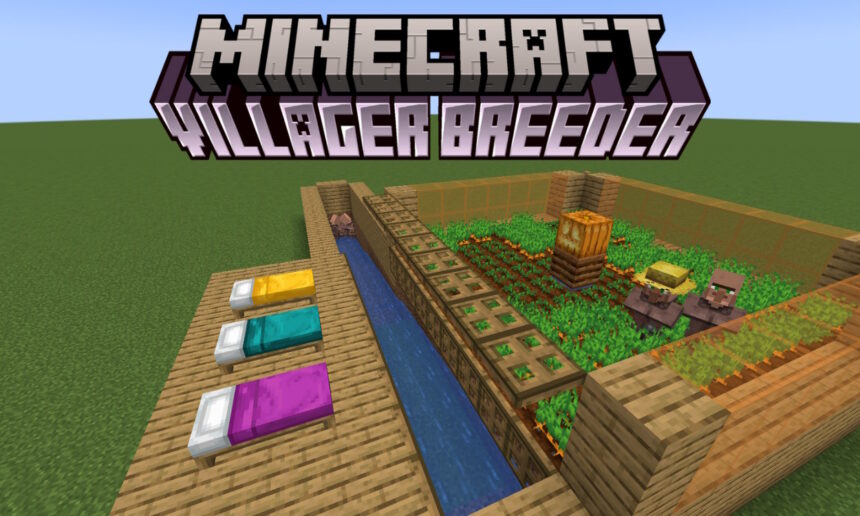
- 3 Beds: Villagers need these to reproduce!
- 2 Stacks of Carrots or Potatoes: Food for the villagers.
- 27 Trapdoors: They’ll help manage the villagers’ movements.
- 3 Water Buckets: To create the water stream.
- 80 Dirt Blocks: For building the farm.
- 1 Light Source Block: Something like a jack o’lantern or a sea lantern to provide light.
- Building Blocks: Use whatever you like.
- Glass Blocks (optional): For a nice clean look.
- Minecarts or Boats (optional): These can help transport villagers.
Picking the Right Spot
Before you start building, choose a good spot for your farm. Make sure it’s not too close to an existing village, or the villagers might run over and claim the beds you set up. You can build this in any biome—above ground, underground, or even in the sky!
Step-by-Step Guide to Building Your Villager Breeder
1. Create the Crop Farm
- Start with the water: Place a water source block in the ground.
- Tilling the Land: Use a hoe to till the dirt blocks in a 9×9 area around the water.
- Add the Composter: Put it right above the water source.
- Plant Yummy Crops: Use your carrots or potatoes to plant the crops around.
- Build a Wall: Create at least a 2-block high wall around three sides of the farm to keep the villagers safe. You can also use glass blocks to see inside.
2. Create the Bed Area
- Setup Trapdoors: Attach 9 trapdoors to the side of the farm without the wall.
- Build a Platform: Make a small platform (9×4 blocks) where you’ll place the beds.
- Add Beds: Place the three beds on top of the platform.
- Light It Up: Make sure to keep the area lit so that no mobs appear.
3. Build the Water Stream
- Finish the Trapdoors: Place another row of trapdoors above the first row, just slightly higher so that players can fit but baby villagers can’t escape.
- Dig Down: Make a hole that’s 2 blocks deep right next to the trapdoors.
- Create the Water Stream: Build walls around the hole and fill the bottom with water. The water will carry the baby villagers away!
4. Move the Villagers In
Now for the fun part! You need to bring in your two villagers. You can use minecarts or boats to transport them to the farm. Once they’re in, give them some crops to kickstart the breeding process!
How the Breeder Works
Here’s how it goes down: your farmer villager will collect food from the crop farm, and they will share it with the other villagers. Food is essential for breeding! The traps and water ensure that baby villagers can find their way into a safe area, away from the adult villagers, who just keep on producing more!
Tips for Success
- Make sure there’s enough light around your crops.
- Protect your farm from zombies and other mobs by lighting it up.
- You can decorate your farm but keep the main parts functional.
Questions for You!
- What is your favorite food to grow in Minecraft, and why?
- If you could have any villager profession, which one would you pick?
- Have you ever created a villager farm before? Share your experiences!
So there you have it! An easy way to create a villager breeder farm in Minecraft that can boost your trades and enhance your gameplay. What cool things do you plan to do with your new villagers? Let us know in the comments below! Happy crafting!